Challenge 5 : DDM & Access Control
In this challenge, you will explore the DDM (Decentralized Data Management) data lifecycle end-to-end from upload to metadata enrichment to data quality validation and observe how identity + project scoping are enforced across every stage.
You will validate that the DDM:
- Ingests datasets and registers them in a searchable catalog,
- Generates and stores derived artifacts, including:
- system metadata
- profiling reports (HTML),
- Bounds to your identity and project
- Enriches dataset schema using LLM-assisted column descriptions
- Supports reusable expectation suites for data quality evaluation
- Produces validation artifacts, linked to both the dataset and the expectation suite
- Enforces access control consistently across all artifacts via:
- project_id scoping (primary isolation boundary)
- uploader identity binding (ownership + provenance)
- artifact lineage (derived assets inherit the same scope as the source dataset)
- catalog visibility rules (no cross-project or cross-user discovery).
Estimated Time : 30–45 minutes
Difficulty Level : Low/Intermediate (Python understanding needed if challenging with sdk)
- Upload heterogeneous datasets (CSV, Parquet, XLSX, PNG/JPG, GeoPandas, etc.) and store in zenoh p2p network
- Register them in the catalog with metadata (type, size, category, description, owner, project_id, paths, lineage references)
- Parse structural metadata (schema, column types, summary statistics)
- Enrich metadata with human-readable column descriptions (LLM-assisted)
- Generate dataset profiling reports (HTML artifacts)
- Store system-generated file metadata alongside the raw dataset
- Track derived operational artifacts, including file stats (downloads/views), file history (lineage/parent files), and user action logging for auditability
- Build and run advanced catalog searches using filters
- Save reusable queries as personal artifacts (user-scoped)
- Use UI feedback (reports, validation pages) to iteratively refine and verify results
- Create expectation suites (rules/constraints describing “high quality data”)
- Validate datasets against suites, producing validation results artifacts
- Enforce access decisions using Attribute-Based Access Control via context handlers
- Authorize requests based on runtime attributes such as:
- user identity (username / sub / roles)
- resource ownership (file.user_id, suite.user_id)
- project scope (project_id)
- action type (upload, download, validate, view report, etc.)Ensure access control applies not only to raw datasets, but also to all derived artifacts (metadata, reports, suites, validations, saved queries)
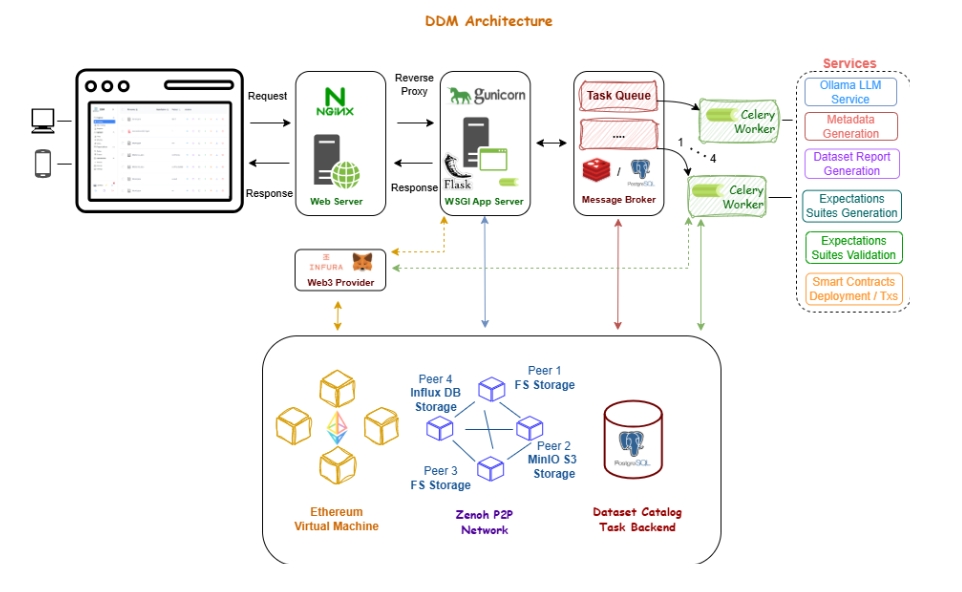
See Appendix for full DDM architecture and component overview.
Prerequisites
You can complete this challenge in two equivalent ways:
Both options follow the same steps and validate the same access-control + artifact lineage behavior.
If you choose the DDM UI option, you can reference the implementation details here.
If you choose the DDM Client (SDK) option, use this repository.
- progress tracking in real-time
- step-by-step guidance for UI and SDK
- screenshots + links to github assets
Files used in this guide : sample_files/
Client SDK : script 01_upload_file.py
DDM UI: Upload Page
- Upload the following datasets:
- Titanic-Dataset.csv
- titanic.parquet
- titanic_large.csv
under:
- project_id = (a) <username> if using ui
(b) tutorial-<username> if using client sdk
Use consistent metadata for all three uploads:
- use_case = crisis
- description (CSV) = “Challenge 05 CSV upload”
- description (Parquet) = “Challenge 05 Parquet upload”
- description (Large CSV) = “Challenge 05 Large CSV upload”
Capture all returned file_id values.
Client SDK : attach_metadata.py
DDM UI: Upload Page
- Locate the file:
- titanic.parquet (the parquet file uploaded in Step 1)
- Edit the sample metadata file:
- uploader_metadata.json
- fill fields that identify you ( username , challenge )
- Attach the edited uploader_metadata.json to titanic.parquet as uploader metadata.
Access control insight
The parquet file now has identity-bound uploader metadata, meaning it becomes part of the dataset’s provenance and should only be visible/usable within your identity and project scope.
Key question : Can uploader metadata be observed only where expected?
Client SDK : 03_download_file_metadata.py
DDM UI: My Catalog
- Use the same project_id = (a) <username> if using ui
(b) tutorial-<username> If using client sdk
- For two files (TitanicDataset.csv and titanic.parquet), retrieve the system-generated file metadata that DDM produced after ingestion (schema, types, summary stats, system fields, etc.)
Client SDK : 04_download_report_html.py
DDM UI: My Catalog
- Use the CSV file_id (Titanic-Dataset.csv from Step 1).
- Download the profiling report HTML derived from the dataset.
- Open the report and inspect the data duality metrics / statistics / missingness / distributions.
Client SDK : 05_catalog_advanced.py
DDM UI: Catalog advanced
- Create and run advanced query using filters.json.
- Ensure the query is scoped to your tutorial project:
- project_id = (a) <username> if using ui
(b) tutorial-<username> If using client sdk
- Note how many files are returned initially.
Modify filters until only one file is returned, specifically the CSV you uploaded in Step 1 (Titanic-Dataset.csv).
Client SDK : 06_save_advanced_query.py
DDM UI: Catalog advanced
Client SDK script: 06_save_advanced_query.py
- Save the final query (the one returning 1 CSV file).
- Use name such as:
- tutorial-<username> (or <tutorial> if you re using UI)
Treat the saved query as a personal reproducible artifact (it should remain bound to your identity and not be reusable by other users unless explicitly shared by design).
Client SDK : 07_create_suite.py
DDM UI: Create Expectations page
- Create an expectation suite using titanic-sample.csv dataset (for generating rules + enriched descriptions) and expectations.json.
- Use:
- project_id = tutorial-<username> if you are using SDK
<tutorial> if you are using UI
- suite_name = tutorial-<username>
- expectations source =expectations.json
- The expectations you will have to set, are shown in expecttions.json ffile.
If you are using DDM UI,see Appendix for expectations you will have to set in human readable format.
This step also triggers LLM-assisted enrichment, producing human-readable column descriptions linked to the suite.
In the UI Expectations page, you can see:
- suite details
- enriched column descriptions
- charts/graphs derived from suite metadata
The suite is reusable by reference, but does not grant access to datasets outside your project.
Generate expectations suite and capture suite_id.
Client SDK: 08_validate.py
DDM UI: Validations page
Validate Titanic-Dataset.csv against the suite from Step 7.
Inputs you must use:
- suite_id (Step 7)
- file_id (Step 1 CSV)
- project_id = tutorial-<username> if you are using SDK
<tutorial> if you are using UI
After completion, open Validation Results and review:
- success/failure status
- failed expectations and details
- linked dataset + linked suite
Then repeat validation using the large titanic_large.csv file_id from Step 1, and compare differences.
Validation results are stored as artifacts linked to both:
- the dataset (file_id)
- the suite (suite_id)
Access control insight
Reusing a suite across datasets does not bypass access controls: every validation remains scoped to the dataset’s project/owner.
Client SDK: 09_download_file.py
DDM UI: My Catalog
- Use:
- file_id = the file you want to download (the Titanic-Dataset.csv file id from Step 1)
to download the uploaded file.
Client SDK: 10_catalog_list.py
DDM UI: My Catalog
- List catalog entries for your tutorial project:
- project_id = tutorial-<username> if you are using SDK
<tutorial> if you are using UI
- Confirm that:
- all 3 uploaded files exist
- derived artifacts (metadata, reports, validations) are visible where expected.
Create a new account and login.
Run whichever steps you want among 2,3,4,9.
What message you receive?
Deliverables
The backend endpoint checks step completion based on stored artifacts and logs, returning per-step status (pending/success/failure). Additionally you will have to provide a file with short answers:
-
What defines access control in DDM?
-
Why did expectations fail or pass?
-
Which dataset had better validation performance and why?
-
What is the key for reusable expectations?
Can uploader metadata, reports etc. be observed only where expected?
Appendix
Expectations Sample
0) Create the suite shell
-
1. Go to Expectation Suites → Create Suite
-
2. Name it (e.g. tutorial__suite)
-
3. Click Next to upload sample file
-
4. Select the sample dataset: titanic_sample.csv and upload it
-
5. Click Next to enter the suite editor and fill in the next.
1) Table-level expectations
-
A) Column count between
Add Expectation: Select (expect_table_column_count_to_be_between); Min value (1); Max value (11)
-
B) Columns match ordered list
Add Expectation: Select (expect_table_columns_to_match_ordered_list); Column list (in this exact order-prepopulated by DDM): PassengerId, Survived, Pclass, Name, Sex, Age, SibSp, Parch, Ticket, Fare, Embarked
-
C) Row count between
Add Expectation: Select (expect_table_row_count_to_be_between); Min value (1000); Max value (200000); Strict min (false); Strict max (false)
2) Column-level expectations (add these one by one)
- Not null
Add Expectation
- Select: expect_column_values_to_not_be_null
- Column: PassengerId
- Mostly: 0.95
- Unique
Add Expectation
- Select: expect_column_values_to_be_unique
- Column: PassengerId
- Mostly: 0.95
- Not null
- Select: expect_column_values_to_not_be_null
- Column: Survived
- Mostly: 0.95
- In set
- Select: expect_column_values_to_be_in_set
- Column: Survived
- Mostly: 0.95
- Value set: [“1”, “0”]
- In the UI: add 2 values: 1 and 0 (press enter-it is “chips” elements)
Not null
- Select: expect_column_values_to_not_be_null
- Column: Pclass
- Mostly: 0.95
- Not null
- Select: expect_column_values_to_not_be_null
- Column: Name
- Mostly: 0.95
- Unique
- Select: expect_column_values_to_be_unique
- Column: Name
- Mostly: 0.95
- Not null
- Select: expect_column_values_to_not_be_null
- Column: Sex
- Mostly: 0.95
- In set
- Select: expect_column_values_to_be_in_set
- Column: Sex
- Mostly: 0.95
- Value set: [“male”, “female”]
- Not null
- Select: expect_column_values_to_not_be_null
- Column: Age
- Mostly: 0.95
- Min between
Select: expect_column_min_to_be_between
- Column: Age
- Min value: 0
- Max value: 2
- Strict min: false (unchecked)
- Strict max: false (unchecked)
- Mean between
Select: expect_column_mean_to_be_between
- Column: Age
- Min value: 33
- Max value: 88
- Strict min: false (unchecked)
- Strict max: false (unchecked)
- Not null
Select: expect_column_values_to_not_be_null
- Column: SibSp
- Mostly: 0.95
- Min between
Select: expect_column_min_to_be_between
- Column: SibSp
- Min value: 0
- Max value: 15
- Strict min: false
- Strict max: false
Not null
Select: expect_column_values_to_not_be_null
- Column: Parch
- Mostly: 0.95
- Not null
Select: expect_column_values_to_not_be_null
- Column: Ticket
- Mostly: 0.95
- Unique
Select: expect_column_values_to_be_unique
- Column: Ticket
- Mostly: 0.95
Not null
Select: expect_column_values_to_not_be_null
- Column: Fare
- Mostly: 0.95
Embarked
- Not null
Select: expect_column_values_to_not_be_null
- Column: Embarked
- Mostly: 0.95
- In set
Select: expect_column_values_to_be_in_set
- Column: Embarked
- Mostly: 0.95
- Value set: [“C”, “Q”, “S”]
3) Final step
-
Click Save Suite